From daily commutes to intense workouts, your earbuds are exposed to a surprising amount of grime. Sweat, earwax, skin oils, and pocket lint quickly build up, making them a haven for bacteria and impacting your listening experience.
This step-by-step guide will walk you through the safest methods and essential tools to clean earbuds, ensuring they look, feel, and sound better. You’ll learn how to tackle everything from daily upkeep to a thorough deep clean, protecting your hearing health and your audio gear.
We will cover why earbuds get dirty, what safe cleaning materials to use, and offer step-by-step tips for how to clean earwax out of earbuds, handle silicone tips, and care for wireless earbuds and AirPods. We’ll also discuss sanitization and cleaning frequency. Understanding if wired headphones are safer than wireless is important for overall earbud hygiene.
Quick Navigation & Previews
- Why Do Earbuds Get So Dirty?
- Is It Safe to Clean Earbuds?
- What You’ll Need Before Cleaning
- How to Clean Earwax Out of Earbuds
- How to Clean Silicone Earbud Tips
- How to Clean Wireless Earbuds & AirPods
- How to Sanitize Earbuds Properly
- How to Deep Clean Earbuds (Monthly Routine)
- How Often Should You Clean Your Earbuds?
- Conclusion
- FAQs
Why Do Earbuds Get So Dirty?
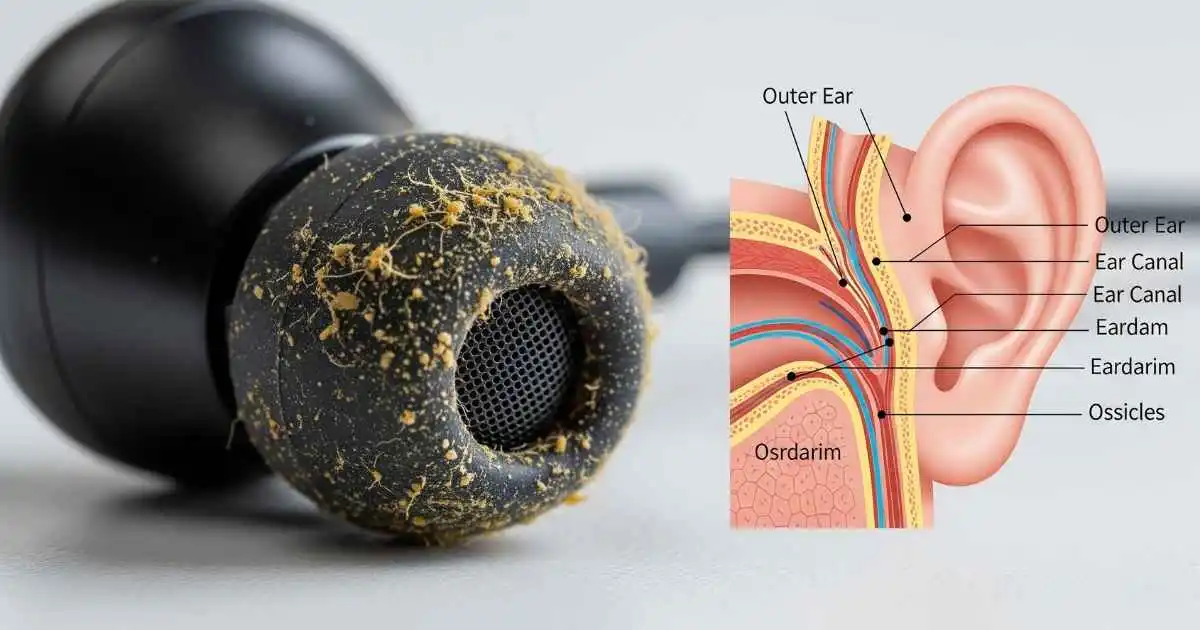
Earbuds are prone to collecting dirt simply because of where and how they’re used. They sit directly inside your ear canal, making them magnets for various forms of grime.
Common reasons why my earbuds get so dirty include:
- Sweat, skin cells, and earwax buildup: These natural bodily secretions are the primary culprits, adhering directly to the earbud surface and mesh.
- Pocket dust and bag debris: Lint, crumbs, and other particles from daily storage areas easily cling to sticky residue.
- Daily use in multiple environments: Whether you’re at the gym, commuting, or outdoors, earbuds are exposed to external dirt and pollutants. Even specialized gear, like gaming earbuds, can also trap grime—especially in the mesh, affecting performance.
Is It Safe to Clean Earbuds?
Yes, it’s absolutely safe to clean earbuds without damaging them, but only if done correctly. Improper cleaning can lead to serious damage or even destroy your earbuds.
Here’s what you need to know about safety and materials for the safest way to clean earbuds:
Safety first:
Always exercise caution and avoid excessive moisture or harsh chemicals.
Safe Tools & Liquids:
Always opt for gentle, non-abrasive tools like soft microfiber cloths, dry cotton swabs, or soft-bristled toothbrushes to prevent scratching or damaging delicate surfaces.
Use minimal liquids to avoid moisture seeping into sensitive internal electronics. For instance, isopropyl rubbing alcohol (70% or higher) is safe because it evaporates quickly, effectively dissolving oils and sanitizing surfaces.
What to Avoid:
Conversely, never use harsh solvents like acetone or strong household cleaners. Also, avoid using excessive water directly on the earbuds, as it can cause irreversible damage to their internal components.
What You’ll Need Before Cleaning
Before you start, gather a few common household items to ensure you have everything for how to clean earbuds at home effectively and safely. Having your tools ready prevents interruption and ensures a thorough job.
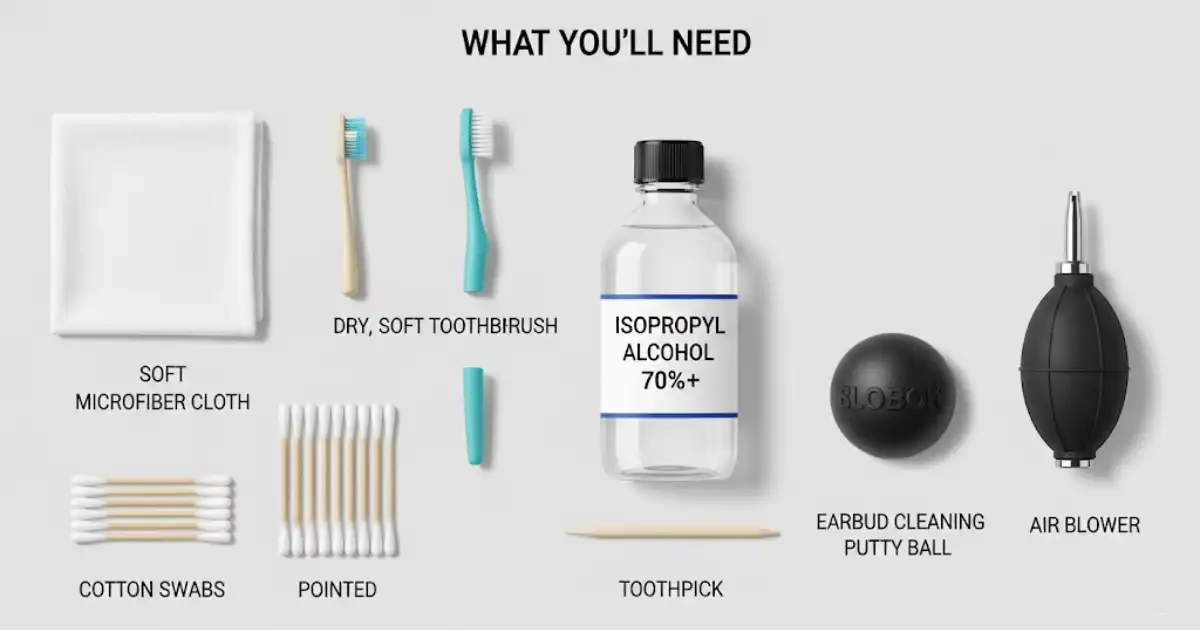
Essential Tools:
- Soft, dry microfiber cloth: For general wiping and polishing.
- Dry, soft-bristled toothbrush: Ideal for gently dislodging debris from mesh.
- Cotton swabs (dry or lightly dampened with alcohol): Great for crevices and intricate areas.
- Isopropyl rubbing alcohol (70% or higher): For sanitizing and dissolving stubborn grime.
- Toothpick or precision tool: For carefully picking out stubborn earwax (use with extreme caution).
Optional but Recommended:
- Small air blower (like for camera lenses): To blow out dust without force.
- Earbud cleaning putty or sticky tack: Can lift debris from mesh without pushing it in.
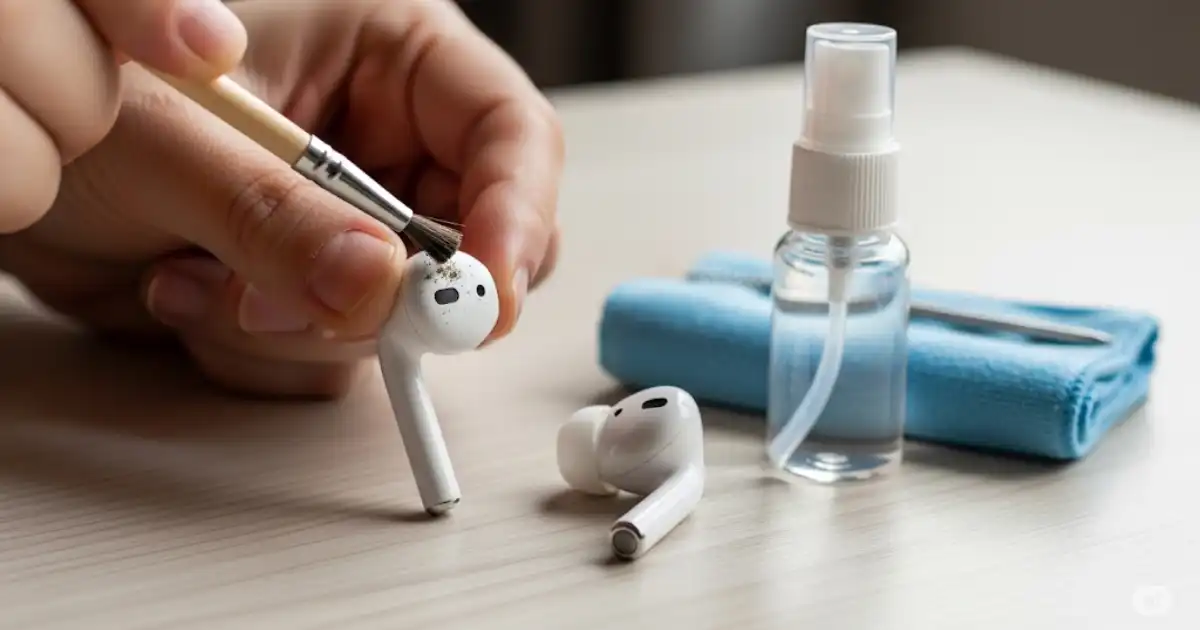
How to Clean Earwax Out of Earbuds
Earwax buildup is perhaps the most common culprit behind muffled sound or hygiene concerns. Learning how to clean earwax out of earbuds effectively is crucial for maintaining audio quality and cleanliness. Be gentle to avoid pushing wax further inside.
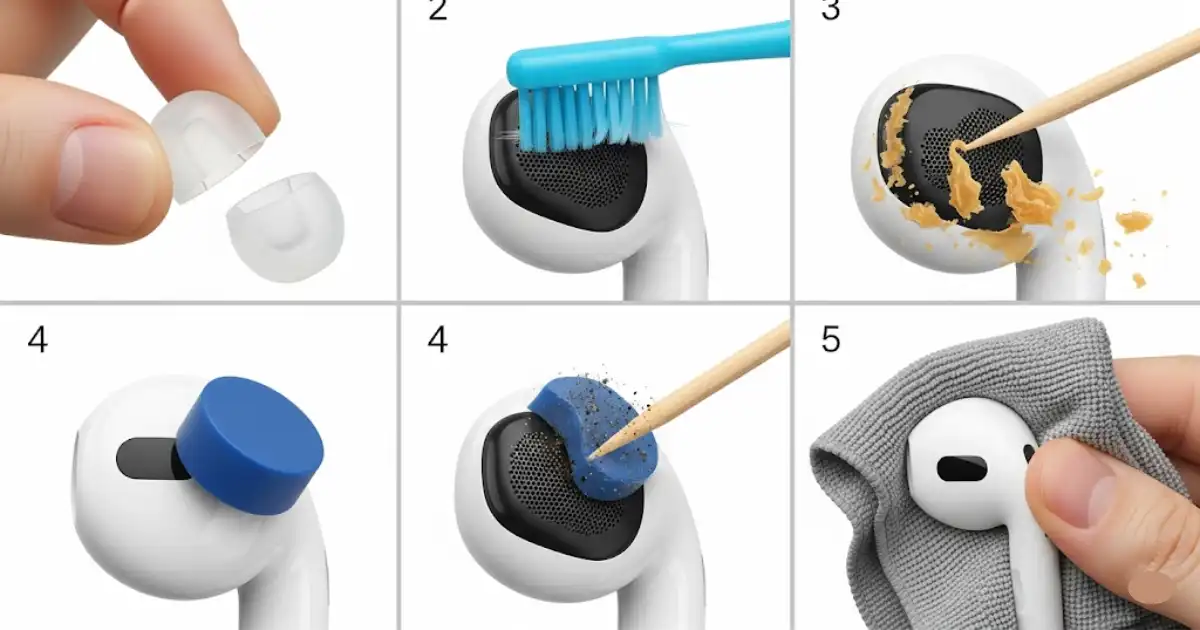
- Remove Silicone Tips: If your earbuds have removable silicone tips, gently take them off first. This allows direct access to the mesh underneath.
- Gentle Brushing: With a dry, soft-bristled toothbrush, gently brush the earbud mesh or grille. Angle the earbud downwards so any dislodged wax falls out, rather than into the speaker.
- Toothpick for Stubborn Spots: For hardened wax, very carefully use a toothpick or a dedicated earbud cleaning tool. Scrape gently around the edges of the mesh, lifting the wax out without puncturing the mesh.
- Sticky Tack/Putty (Optional): Press a small piece of earbud cleaning putty or sticky tack onto the mesh, then quickly pull it off. This can effectively lift out embedded grime from the earbuds mesh.
- Wipe Clean: Use a dry microfiber cloth to wipe away any remaining residue.
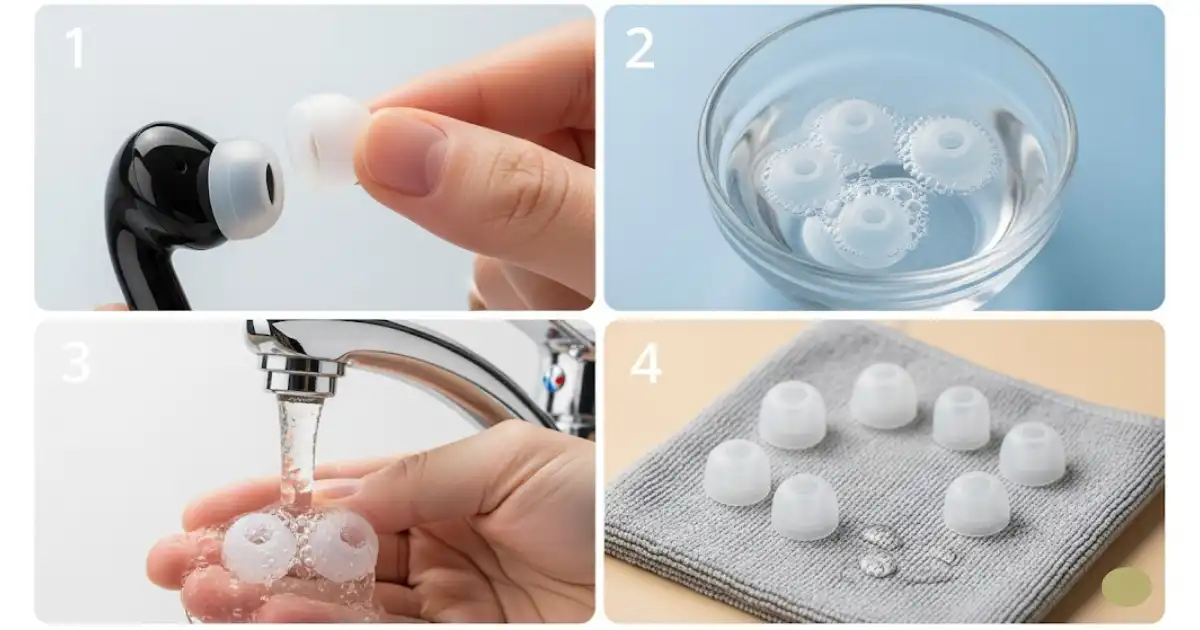
How to Clean Silicone Earbud Tips
Silicone earbud tips are often the dirtiest part as they sit directly in your ear canal. Fortunately, how to clean silicone earbud tips is one of the easiest steps in the process, as they are durable and washable.
- Remove the Tips: Always gently pull the silicone tips off the earbuds first. Cleaning them while attached could risk damaging the earbud’s electronics.
- Wash with Soap and Water: Place the silicone tips in a small bowl of warm water with a drop of mild dish soap. Agitate them gently to loosen any earwax or oils.
- Rinse Thoroughly: Rinse the tips under clean running water to remove all soap residue. Ensure no soap remains, as it could irritate your ears.
- Dry Completely: Crucially, let the silicone tips air dry completely on a clean cloth or paper towel before reattaching them to your earbuds. Any remaining moisture can harm the earbud’s internal components.
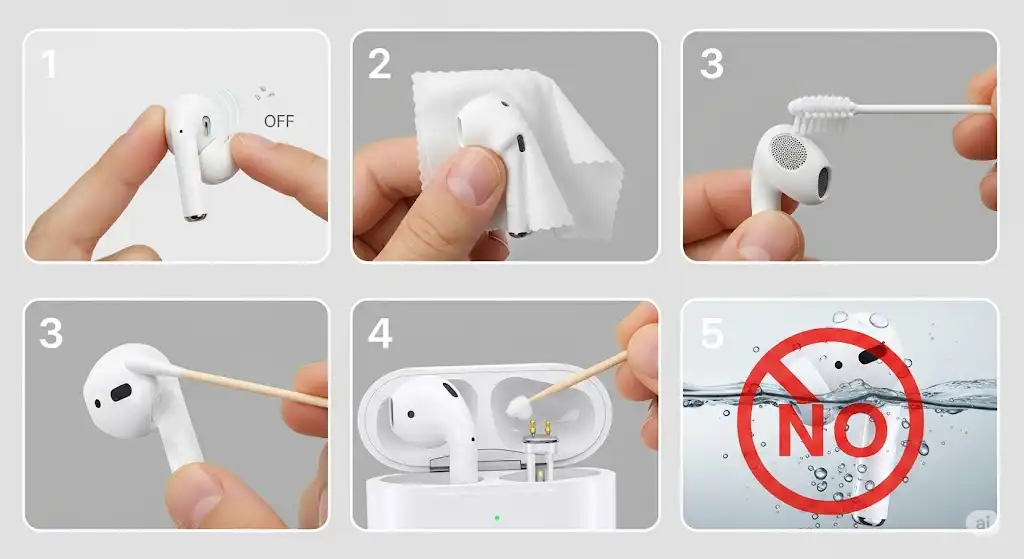
How to Clean Wireless Earbuds & AirPods
Cleaning wireless earbuds and specifically AirPods requires extra caution due to their integrated electronics and charging contacts. Never submerge them in water or use excessive liquid. Always power them off first.
- Power Off: Before any cleaning, ensure your wireless earbuds are powered off and disconnected from any charging case or device.
- Wipe Down: Use a dry, soft, lint-free cloth (microfiber works best) to gently wipe the exterior of the earbuds.
- Address Mesh/Grilles: For speaker grilles or microphone mesh, use a dry cotton swab or a soft-bristled toothbrush to gently brush away debris. If you have AirPods, pay special attention to the mic openings, as mic issues may also be caused by buildup—especially in AirPods.
- Clean Charging Contacts: Use a dry cotton swab or a toothpick (very gently) to clean the charging contacts on both the earbuds and inside the charging case. These can accumulate lint and affect charging.
- No Submerging: Never run water over wireless earbuds or submerge them. For stubborn spots, lightly dampen a cloth with rubbing alcohol, then wipe and immediately dry.
How to Sanitize Earbuds Properly
Beyond just cleaning away visible dirt, knowing how to sanitize earbuds properly helps eliminate bacteria that can cause ear infections or skin irritation. Alcohol is generally your best bet, but use it sparingly. For cleaner sound and reduced distractions, proper sanitization can even enhance your listening experience, especially with noise cancelling earbuds.
- Use Isopropyl Alcohol: Lightly dampen a cotton swab or a corner of a microfiber cloth with 70% or higher isopropyl rubbing alcohol.
- Gentle Wipe: Gently wipe down the outer surfaces of your earbuds, avoiding any openings, speaker grilles, or charging contacts. Alcohol evaporates quickly, but excess moisture is still a risk.
- No Soaking: Never soak your earbuds in alcohol or any other liquid.
- Dry Immediately: After wiping, use a dry part of your microfiber cloth to ensure no moisture remains. Allow them to air dry completely for a few minutes before use.
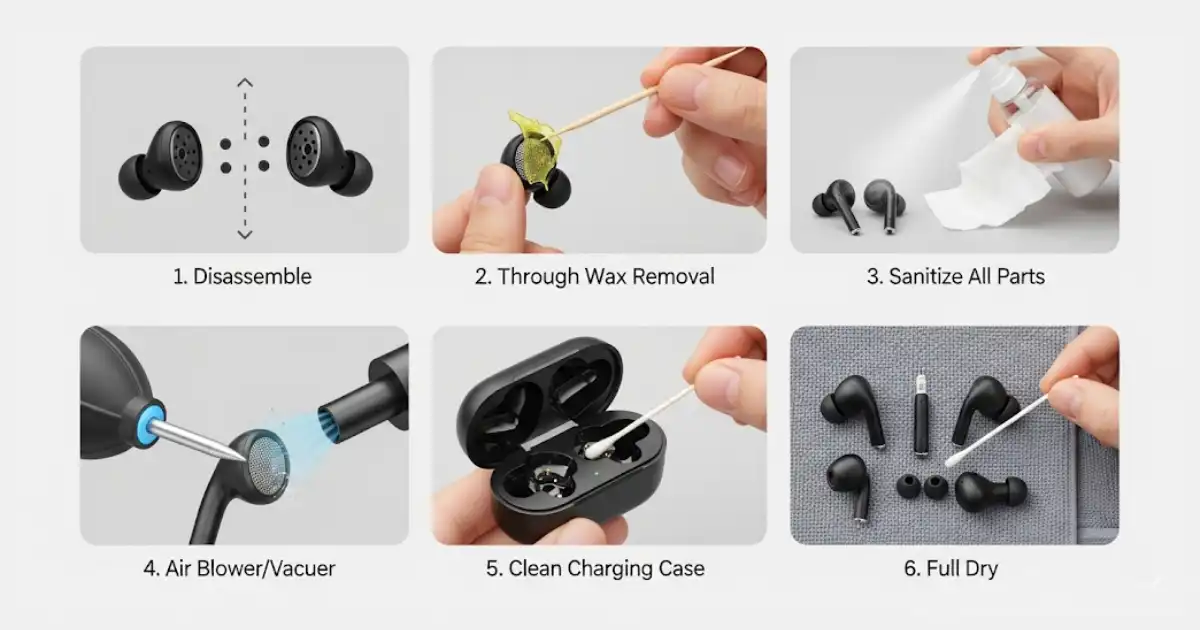
How to Deep Clean Earbuds (Monthly Routine)
A deep clean earbuds routine, typically done monthly depending on usage, goes beyond quick wipes to ensure thorough hygiene and optimal performance. This comprehensive cleaning aims to remove all accumulated grime.
For bass lovers, proper cleaning, including deep cleaning, helps preserve audio quality, ensuring your Best Bass In-Ear Headphones continue to deliver rich sound.
- Disassemble: Remove all detachable parts like silicone tips.
- Thorough Wax Removal: Follow all the steps from Section 4 to meticulously remove all earwax from the mesh and crevices.
- Sanitize All Parts: Sanitize both the earbuds and the removed silicone tips using isopropyl alcohol (as in Section 7).
- Air Blower/Vacuum (for mesh): Use a small air blower to clear out any remaining dust or debris from speaker grilles. For truly stubborn particles, some users carefully use a small, low-power hand vacuum, but proceed with extreme caution to avoid damaging the speaker drivers.
- Clean Charging Case: Don’t forget to thoroughly clean the charging case, paying attention to the charging pins and any crevices where dust accumulates.
- Full Dry: Allow all components to dry completely before reassembling.
How Often Should You Clean Your Earbuds?
The frequency of cleaning depends largely on your usage habits. Knowing how often should you clean your earbuds helps maintain hygiene without overdoing it.
- Light Clean: A quick wipe-down with a dry cloth is recommended every few days or after every intense workout. This prevents major buildup.
- Weekly Clean: A more thorough cleaning, including wiping down with a lightly alcohol-dampened cloth and gently brushing the mesh, should be done weekly, especially for daily users.
- Deep Clean: A full deep clean earbuds routine, as described in Section 8, is advisable once every 2–4 weeks. This ensures long-term hygiene and audio integrity.
If your earbuds still sound uneven after cleaning, or if they continue to have issues, it’s time to troubleshoot further or consider professional help.
For instance, if your AirPods won’t respond even after thorough cleaning, you might need specific AirPods troubleshooting. Similarly, if your earbuds still sound uneven after basic cleaning, specific steps on fixing earbuds that work on one side may be helpful.
Conclusion
Regular, safe cleaning is vital for your earbuds. It extends their lifespan, preserves audio quality, and protects your ear health. By following these simple steps, you can confidently remove grime and keep your earbuds sparkling, ensuring crystal-clear sound for longer.
FAQs
Can I use hydrogen peroxide to clean earbuds?
No, hydrogen peroxide is too strong and can damage delicate earbud components and finishes.
Will cleaning affect sound quality?
A: Cleaning should improve sound quality by removing blockages; improper cleaning can damage components and worsen sound.
Can I clean earbuds with water?
Only silicone tips can be washed with water; never submerge the electronic parts of earbuds in water.
Can earwax damage earbuds?
Yes, excessive earwax buildup can block speaker grilles, muffle sound, and potentially cause internal damage over time.
Leave a Reply