Judging by the title, we all know why you’re here. You recently got your brand-new pair of AirPods; you brought them home with high hopes and dreams.
You might have already told your friends, or if you are like us, you may have posted on Instagram as well. After all this, only a few days go by, and you find that one of your AirPods has stopped working.
Even if you have had them for a while, it still hurts just as much. Trust me, we understand. Having AirPods not Working can really put a damper on your spirits. So, what if there was a way to fix this dilemma on your own?
To address this issue, we need to understand some of the reasons why your AirPods may only play in one ear. Once you are familiar with the causes, you will be better equipped to address and resolve the problem.
Keep reading to discover the possible causes and solutions. Also, don’t miss our [Infographic] on how to prevent hearing loss and keep your headphones safe.
Quick Navigation & Previews
Why Are My AirPods Not Working
There can be multiple reasons as to why one or both of your AirPods are malfunctioning, but here we will run through a few basic ones to give you an idea.
1. Pairing Troubles
For starters, if you find your left AirPods not working or your right AirPods not working, they are both probably experiencing the same kind of technical fault, so you can pretty much pinpoint the issue for either side of the AirPods.
Most likely, one of the AirPods is not paired properly with your smartphone. This can occur either due to a weak Bluetooth connection or because of a fault with your AirPods.
Either way, you can recognise this as a potential fault if you are hearing very faint or broken-up audio in your AirPods.
2. Connecting with Older Devices
Now, for this issue, it is essential to remember that AirPods have been engineered and designed specifically for Apple iOS devices. Although they do a good job of maintaining compatibility with many devices, there is a high chance of issues.
This occurs most commonly when you try to pair or connect the AirPods to older devices, such as computers or laptops with outdated Bluetooth compatibility. The reason is quite simple, so there is nothing to worry about.
The good thing here is that you can rest assured that there is nothing fundamentally wrong with your AirPods. Rather the fault lies with the adjacent device, so that is definitely encouraging.
3. Battery Malfunctioning
This might seem like an obvious one, but there are times when you find your AirPods malfunctioning even after a full charge. You can confirm this by checking the battery again and then testing the battery of the charging case to verify.
There are instances where you may encounter this problem because the battery is not registering properly with the AirPods. However, the solution is simple enough, so you don’t have to panic.
In order to find out how to deal with these issues, read on to the next section, which explains the solutions in depth. They are all easy to apply than you might think, so pull up your sleeves and get to work!
Read Also: One AirPod Not Charging? Here’s the Fix!
How Can I Fix My AirPods?
1. Try Resetting Your AirPods
The best way to approach malfunctioning AirPods is to give them a complete overhaul, which means resetting them to their original settings. To begin, place both AirPods in their case. Ensure they are charged before proceeding.
At the back of the case, you have to find a button. It is quite small and the same colour as the case, so feel for it. Once you have found it, open the lid of the charging case. Then, press down on the button at the back of the case and hold it for about 15 seconds.
You will see the light on the inside of the case. It will flash white at first and then red. This light indicates that the AirPods have been reset successfully.
For those of you who have a wireless charging case, you will most likely find this light on the front side of the case.
For the newer version, i.e., the AirPods Pro, the procedure is slightly different. Put your charged AirPods in the case, just as you did before, and close the lid. Leave them for about fifteen seconds and open the lid again.
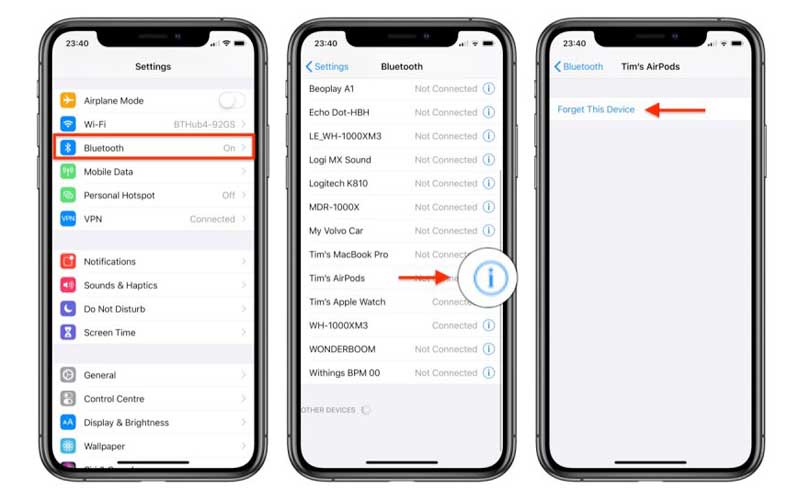
On your Apple iPhone or any other iOS device, open the Settings app and tap on Bluetooth. If the AirPods are connected, locate the circled ‘i’ next to them and tap on ‘Forget This Device’ to unpair them from your device.
With the lid of the casing still open, press and hold the button located at the back of the case for about 15 seconds, or until the light flashes red. This would indicate that your AirPods Pro have been reset.
Read Also: Why is Apple’s AirPods microphone not working? Causes and Solutions
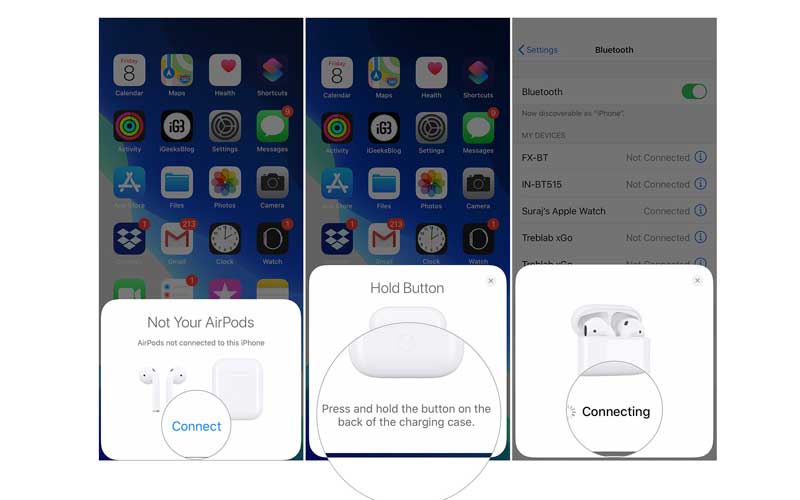
From here on, place the AirPods close to your iOS device once again and follow the instructions to reconnect them as usual.
2. Renew Connectivity
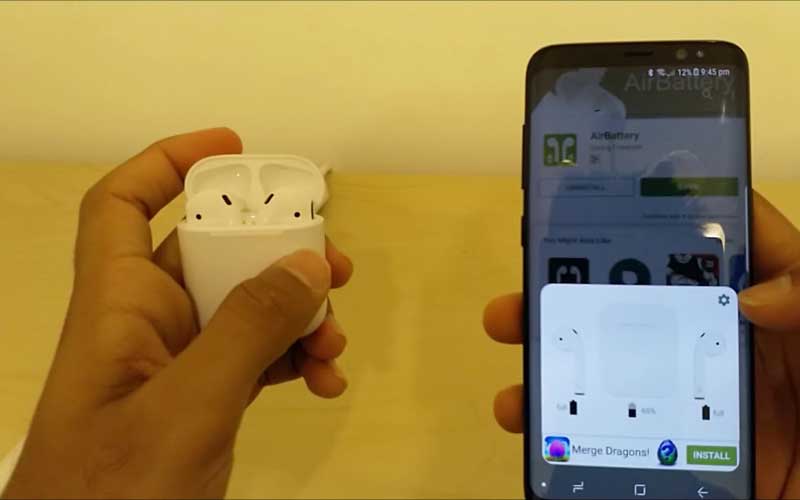
Similar to resetting your AirPods altogether, checking for compatibility when connecting with certain devices is always a good idea, especially if you are working with devices that aren’t iOS or Apple devices, such as computers.
To remedy this, you may want to avoid connecting with such devices altogether. However, if it is absolutely necessary, a good approach is to set up audio compatibility and initialise the Bluetooth settings right from the start.
Another connectivity issue you may face can be caused by interference from another device in the vicinity. If you are at home, it will be easier to locate the device and either disconnect it or move it away from that area.
At most, you might end up with some light static in your AirPods, but it is definitely a step up from not having any sound at all, so you have to count your blessings here.
3. Check The Battery
Keeping your AirPods charged at all times is, of course, a top priority for AirPods users. The way that AirPods batteries work is that you can pop the AirPods back in the case for a quick top-up. You can do this about three or four times before the case itself needs to be charged.
If both components are out of charge, then a battery recharge is long overdue. After a full charge, AirPods will last anywhere between an hour to an hour and a half at max before they need to be charged again.
Therefore, you do not have to worry about your battery underperforming, as that is how it is designed to work. If you have already charged your AirPods, then pop them back into the case for about 15 to 30 seconds.
Open the lid and remove them; they should work fine after that.
4. Test The Casing
If your AirPods are fully charged but still not working. The fault probably lies within the charging case itself that holds them.
The case may be out of charge, or the battery may have a fault that prevents the case from charging even when it is plugged in.
You can either replace the batteries of the case if you have a wireless charging case or check the charging wire alternatively to see if there is a fault there. Either way, it is nothing to worry about.
5. Go Back To The Classics
Yes, you guessed it, we are talking about the age-old trick of turning the whole thing off and then on again. Trust us; it works almost anywhere.
To start, you can disconnect your AirPods from your device and then reconnect them. Or try turning off your Bluetooth for once and then turning it back on to see if it makes a difference.
If you want to go the extra mile, then you can even turn your iOS device off and then on again to gauge how the AirPods respond. If you are near devices that are causing interference, you might want to try the same trick with them.
Final Thoughts
Let’s face it; nobody wants to get a new pair of AirPods just because one of them has stopped working. The logistics and the budget don’t match up. So having these easy solutions in your back pocket can really help you out if you are in a pinch, so feel free to channel your inner handyman!
- 10 Best Earbuds for Small Ears Review – Top Picks and Buyer’s Guide
- 15 Best Wireless Earbuds Review – Top Picks & Buyer Guide
- How to Choose the Best Headphones (Wired & Wireless) – Step-by-Step Guide
- Three Things to Look for Best Bass in-Ear Headphones
Leave a Reply